Deviation Actions


Description
See the completed sculpture here!
Here is the over one-year-long process that I embarked upon to make Toothless. I learned a lot, but made a few mistakes too. I wanted to show everything I did to first give anyone who is interested some insight and ideas on how to do your own projects and second so you can learn from my mistakes! Nothing ever goes as smoothly as you think it will! And take heart – if you mess up, you can probably salvage whatever you did wrong.
The most important thing I had to keep in mind about this project was to finish as much as I could before putting the light in. The lights can only withstand temperatures of up to 180 degrees Fahrenheit. Since Sculpey needs to be baked at 275, they’d get fried! So as soon as the lights were in, no more oven bake clay! I can still use non-oven bake clay, though. The best one I know of is Apoxie Sculpt, because after mixing the two parts together you have about three hours in which to sculpt with it before it hardens. I have only worked with it a teeny bit before (to make Tarzan’s hands) and I didn’t feel comfortable doing large amounts of sculpture with it, so I wanted to use as much Sculpey as much I could. It was very, VERY difficult to try to build the whole sculpture around the light.
FYI: The LED kit was purchased here (in blue). However, when curved around the tail the lights were oriented the incorrectly – they were pointing to the side and not up toward the spikes. So I ordered this side-emitting LED, which worked great and plugged right into the battery and switch kit that I ordered before.
So without further ado, here is what I did!
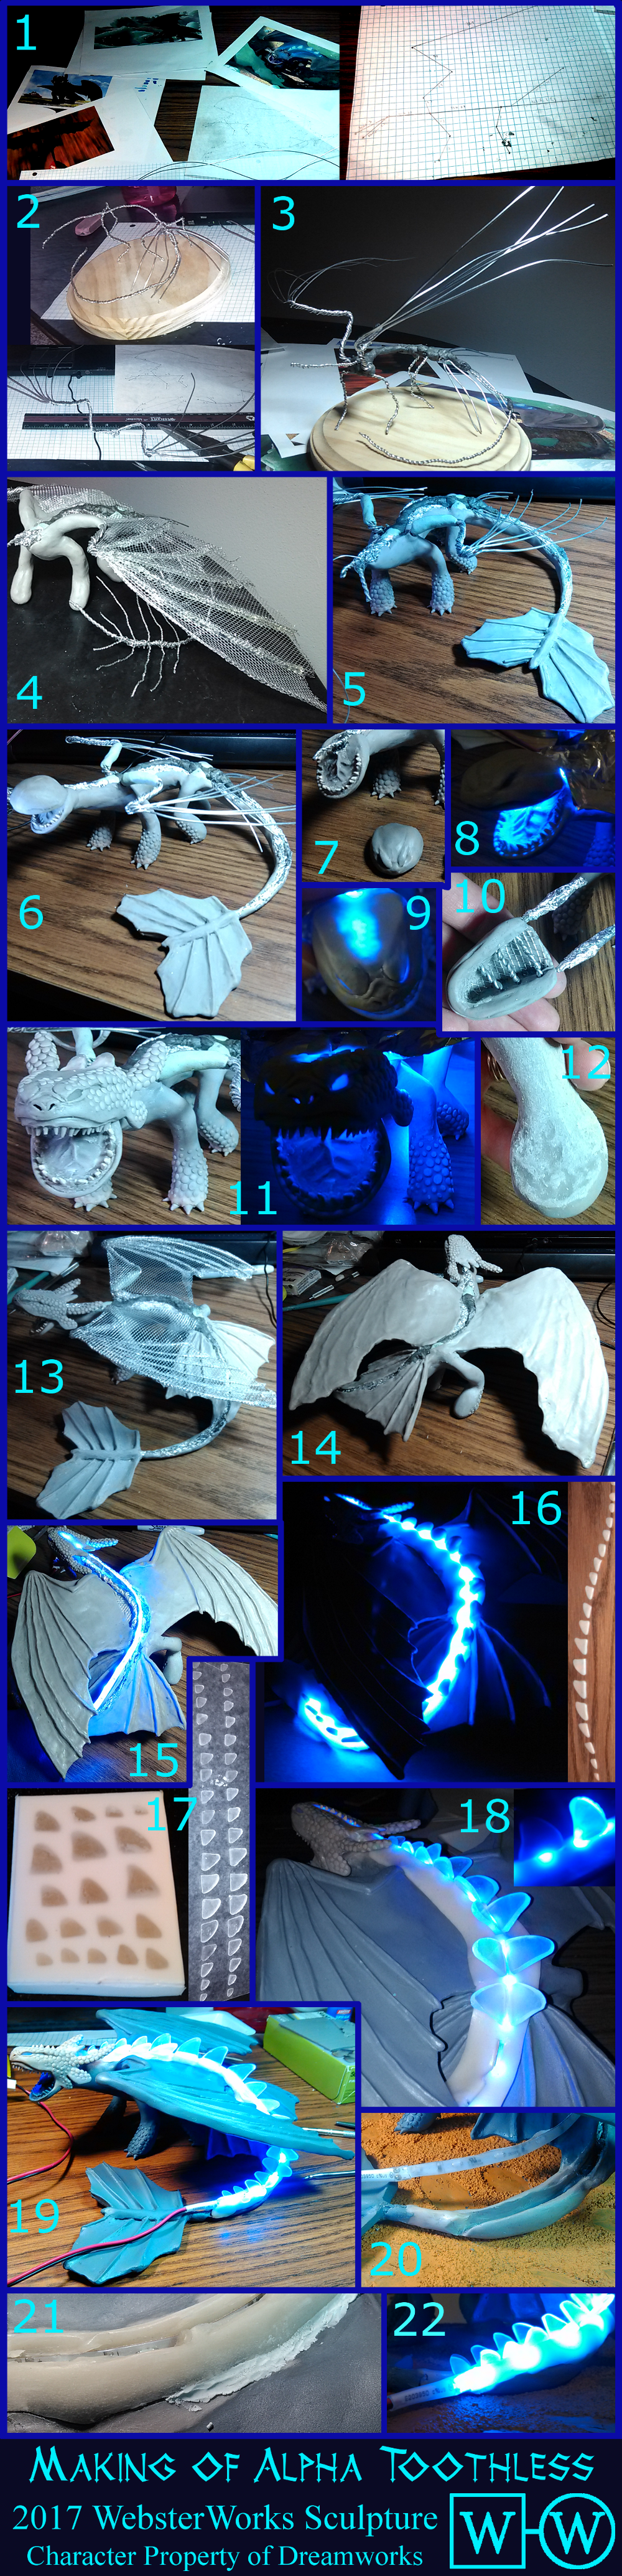
1. Plan, plan, plan! This was probably the most tedious part of the process because I couldn’t wait to start actually working on it, but it was all worth it. I didn’t trust myself to get the proportions right by just eyeballing it (I am not a very good drawer), so I printed many reference pictures from the actual movie and measured each body segment. Hopefully you can see the white tracing paper sheet that I used to draw the ‘skeleton’ and take the measurements (I upped the contrast on these pictures so you can more easily see what I wrote). I tracked everything on an excel sheet, and standardized each reference photo to the same size, then converted all the measurements to the actual size I wanted to make the sculpture. The largest drawing to the right is the actual size blueprint of the wire armature with the correct measurements in a neutral pose. I know this is a bit overkill, but I sort of knew I was going in over my head on this one from the start so I wanted to make sure the first steps were as good as they could be!
2. Here is the completed armature in the iconic pose from the movie. I take one long length of wire and twist it together, holding it up to the actual size blueprint sheet to get the right measurements. When I get to the legs, I separate the wires and bend them back a bit longer than the length of the legs and twist them around separately (it’s much easier to cut off extra than it is to add length to something too short). Then join back up when it reaches the spine again and continue along down the tail. After that, because all the proportions are right and all the joints are in the right place, I can bend it into the pose I want. At this stage, the wings and tail fins are separate and will be added later. Since toothless has six ‘fingers’ in his wings, I make those by twisting together six strands of wire cut to the same length. I then separate out the fingers where appropriate and cut them to the correct length.
3. Now I’ve attached the armature together using plumber’s putty. It’s an epoxy clay-ish thing that comes in two parts. Mix them together and they become very hard in a matter of minutes. If you want more working time, use something like Apoxie Sculpt. It’s so much more expensive, though, that I have a hard time justifying using it when I don’t need to. This part doesn’t need to be pretty; it’s going to be covered up anyways.
4. I then bulk out the armature with aluminum foil, using hot glue to attach it if necessary. This keeps the weight down and ensures more even baking. Over the aluminum foil I started building up the basic shape of the legs and torso with a mix of Super Sculpey and Super Sculpey Firm. I also covered the wing ‘fingers’ with Wireform. It’s just aluminum mesh I found at the craft store. I laid the sheet over the wing and drew the basic shape with a marker, leaving enough room to wrap it around the edges. NOTE: Wireform is very sharp when cut! Use care when handling the edges! After I cut it out and folded it around at the ends, I used hot glue to secure it along the wire frame. However… as I went along, I realized that the wings were rather large. Plus they were in the way of everything. I was having trouble detailing the legs and adding clay anywhere underneath the wings because I could only access it from one side.
5. So here I took the Wireform off in order to re-shape the wing finger wires underneath to bring them in a bit, as well as do it much later when I am finished detailing everything else. I also finished detailing the shape of the legs and adding the scales and claws.
6. The tail is fully detailed and I have begun the neck and lower jaw. I have also baked everything (except the top of his head) so that I don’t mess them up as I continue with another part of the sculpture. It’s a bit harder to blend unbaked clay into baked clay, but when doing a large piece it is absolutely worth it to not have to go back and continually clean up and fix parts that you’ve smudged or smooshed because you were holding on to it while working elsewhere. For the teeth, I made them separately and baked them first so I could more easily insert the hardened teeth into the jaw.
7. Head progress – First I began detailing the angry eyebrows and general shape of the head. Still looks mostly like a toad. Currently, his head has an aluminum foil interior with clay on the outside. I had built the aluminum around the armature so I could slide it on and off.
8. Then as I was playing around with the lights, I thought… wouldn’t it be awesome if the eyes glowed as well? I know they don’t in the movie, but since the LEDs can be turned on and off I figured some artistic liberty was in order. I was already planning on making the top of his head glow, it shouldn’t be too hard to do that to his eyes, right? Boy was I wrong! I had to take all the aluminum foil out, then figure out how to make it thin enough for the light to shine through, but structurally sound enough that it wouldn’t bend or break. Then I had to find a new way to attach it to the armature.
9. I detailed his face and made him a bit more snarly, as well as cleaned up the side so that he looks less toad-like. Then I took out the foil and hollowed out his head more. I replaced the top with a thin sheet of transparent Premo! brand clay (which comes in small 2 oz packages). I also hollowed out his eye sockets and nostrils and replaced the eyes with a half-oval of transparent clay. This was much easier said than done. With every step I was afraid I would ruin it and have to start the head over. Here I am testing it out with the LED inside, and it works!
10. Here is what the head looks like from below. The Wireform in the top and the wire crossbars were needed for stability, as I hollowed it out so much in order to get the light to shine through with the intensity I wanted that it was rather flimsy. I also used the crossbars to attach his head to the existing armature. I actually had to wrap small wire around the armature, then weave it through those crossbars and pull it tight through his mouth. It was very tricky, but I eventually did it with the help of a tiny needle nose pliers. I am also starting to make the largest frills on the top of his head. I made them separately from the rest of his head and left some of wire base sticking out. I inserted the wire into the back of his head and used that as attachment points.
11. Further detailing the head with the rest of the frills, scales, and teeth. Also testing it out with the light installed. Between the two pictures you can also see the difference sanding makes: in the one in the dark I have almost sanded off the top row of leg scales because they were so small.
12. Sanding! I have been sanding the baked parts smooth all along as time allows. I hadn’t really been documenting it though as it’s a pretty boring process. I start with 200 grit sandpaper and try to smooth it out until there are no dark areas, as seen here under his lower jaw. I then go over it again with 400 grit to get the scratch marks out, and 800 if I need it to be really smooth.
13. I have added the Wireform over his wings properly now – with the correct shape underneath! It is mostly secured by folding over the edges, but I did use hot glue along the metal skeleton. I also did the same to the first fin along his tail (pelvic fin? I don’t know what you would call it) but I have covered that with clay already. I made sure to finish as much as I could before adding the wings. His legs and torso are detailed and sanded, and his upper jaw is mostly finished but still detachable, as it’s easier to get the light in that way. I will finish it closer to the final light install. You can’t see it, but I added his tongue in as well. Another thing that’s quite easy to do when there is no upper jaw in the way!
14. And here I covered the wire mesh with clay. I used more Super Sculpey in the mix so it was easier to smoosh and spread. Although it is mostly smooth, you can still see the bumps where the wire is underneath, so I will use that as a guide to detail the wing phalanges.
15. Finished detailing and smoothing the wings and am now testing out the light install. In order to remove the finger prints and get the clay super smooth, I dip my finger in isopropyl alcohol and rub it along the clay surface. That does a really good job of smoothing everything out, but if used too much it starts to ball up and dissolve the clay, so you have to be careful! Here you can also see how I have left a hole in the back of his head in order to slide the LED strip in, sort of like it’s a spinal cord.
16. Here, I made the spines out of transparent clay just like the eyes and top of his head. Unfortunately, they were too large and the clay wasn’t transparent enough to transmit the light through the whole spike. And honestly I didn’t expect it to be – I tested three or four brands and none of them are close to translucent, which is really what I need. In this picture the light is actually under a thin sheet of the Premo transparent clay, which works great when the clay can be thin and close to the light source. However, it wasn’t going to work for the spikes. So I lined them all up and readied to make a mold and cast!
17. I gathered the spines in a box I made out of a cardboard cereal box, fastening them to the bottom with rubber cement. I then poured silicone rubber over the top of them to make a mold, then cast the clear spikes with clear epoxy resin. They came out perfectly clear, with the added benefit that each spike would be identical to its neighbor because they were cast from the same mold. (This video was extremely helpful in showing me how to mold and cast). I then realized that I wanted the area around the spines to glow as well, not just his spikes. However, Apoxie sculpt is completely opaque – even the thinnest layer doesn’t let light through. This was a problem: the transparent clay needed to be baked, but it had to go over the light. The only solution I could see, then, was to make the transparent clay removable so that I could take the light out, bake it, then remove the transparent clay and reinstall the light after baking. So that’s what I tried to do!
18. Here I am installing the spines. Toothless is sanded and primed. I have built up a layer of transparent clay around the installed light and am pressing the resin spines into the clay. The transparent clay is actually in two separate pieces (left and right) in order to make it more easily removable. Also… with the lights off, you can really see the difference in light transmission between the clay and the resin! In the small insert picture, the left spike is transparent clay and the right is resin. It really looks like glass. So glowy!
19. Final spike placement! It’s not baked yet but this was supposed to be the final draft, so to speak. I also finished up the head: added the last frill and connected the upper jaw to the lower.
20. However, I wasn’t happy with how the light strip sat on top of the tail and made it look so bulky. I couldn’t taper it towards the end like I wanted, or sufficiently hide the wire. So, mustering up all my courage, I took a wire clippers to his existing tail, removed a section, and for a terrifying hour worked to make a new one. I was so concerned that I’d ruined it! But in the end I was very pleased with how it came out, as I was able to hollow out a nice groove for the light to sit in. Apparently this is the first picture that shows the box! I made it myself with some unfinished pine boards I got at the hardware store, half inch thick for the outside and quarter inch for the drawer. Cut it with my dad’s circular saw and put together with a nail gun and lots of wood glue. I painted it with spray paint. The dirt texture on the top was made with sand attached to the wood with a 1:1 mixture of Elmer’s Glue All and water. I ‘painted’ the glue mixture over the sand as well, then painted it with regular acrylic paint. Here it’s just the base coat. Later I will dry brush and wash it with a lighter and darker version of the base coat, respectively.
21. After everything was how I wanted it, I carefully peeled the transparent clay off and removed the lights. I then rolled up some aluminum foil and placed it where the light strip would go, then put the transparent clay back. Crossing my fingers, I baked it and found that it held its shape very well! Unfortunately it adhered to Toothless’ back a bit so I had to pry it off with an xacto knife in some places, but it came off very well and I was able to put the light back in and replace the transparent clay without breaking anything! I ended up only using Apoxie Sculpt a tiny bit: for smoothing the seam between the transparent clay and Toothless’ back (it’s the white stuff). Here I am adding the Apoxie and smoothing it out as I go along. It’s a very interesting medium to work with because it starts out very sticky but gets progressively harder as time goes on and the chemicals react with each other and solidify. You can see the LED strip peeking out from inside! Oh, and I did have to go back and sand it one final time to ensure maximum smoothness.
22. Lastly, I attached the spines in their indentations with super glue and basked in the glowiness! To hide the wire, I will drill a hole in the box he sits on and use a strategically-placed ice chunk to hide the hole. After that all that was left to do was make the environment and paint! This is already long enough so I won’t go over that (I also didn’t really take many good pictures).
Hopefully that was helpful, and congratulations if you made it this far! Thank you for reading!